Friday, September 26, 2014

Chevy Tahoe 2002 Steering Column Rod Knocking or Rattling or Clunking

This is just one of those things with this model/year of GM vehicle.  When you go over a bump or a turn it sounds like something inside the steering wheel is loose and knocking against itself.  I've heard a bunch of people complain about it.  I lived with this "knocking" for years until I discovered the fix and it so easy to fix.

I know I'm not using all of the correct terminology but I don't think you need to know all that to fix this issue.  Pop the hood and you'll notice you can see where the steering shaft comes through the firewall between the engine and the inside of the vehicle.  There is a single bolt and nut that attaches this shaft to another piece that actually turns the axle/tires.  Take this nut/bolt off which will free the steering shaft.

This is where it gets weird.  You will be able to use the "That's What She Said" line after every other sentence.  Now push the shaft back up into the steering column (towards the inside of your truck), it will easily slide in and out.  Do this in and out motion about 30 times.  This will feel like you are abusing your truck but what is happening is that you are redistributing the lubricant within the steering rod.  The original problem is with the design of the rod, it lets the lube all run to the bottom end and that creates your noise.  Here's some good info and a video on how to fix.


http://www.silveradosierra.com/transmission/how-to-fix-the-steering-clunk-t15336.html


Chevy EBCM Fix - ABS Light Constantly Staying On

If you have a Chevy Tahoe or Silverado that was made in the early to mid 2000's, then you may have a problem with your ABS light coming on at random times.  My security light would come on as well as my emergency brake light.

With some digging I discovered this is a common problem and it is caused by a cheap ass component used in the Anti Lock Brake system.  This is called the EBCM (electronic brake control module).  So the problem is that this little module is shorting out and sending random signals to your dash.  What you need to is to remove it, repair it, and reinstall it.  Here is a link to a Chevy forum that really goes into detail on how to remove your EBCM and the overall procedure so I'll just give the highlights of my experience.

http://chevyavalanchefanclub.com/cafcna/index.php?topic=121523.0

It's located underneath your driver's seat under the carriage of the vehicle (not like under your seat inside your truck, actually under the vehicle).  It's fairly easy to remove, but you have to get a really short handled screwdriver or one that bends to the side like a ratchet.  There are four screws and like three electrical connections.  Once you have it removed, wrap the place where it was with duct tape as well as each of the electrical connectors to keep dirt and moisture out if you are going to drive the vehicle with the EBCM being installed.  If you can leave the vehicle in your garage for a few days, don't worry about it.

You can repair it yourself if your good with circuit boards and what not, but I elected to just send it off and have it repaired for about 100 bucks.  There are tons of sites that do stuff like this.  I think I sent mine to Module Masters, but I also saw one called ABS Fixer.  They repaired and sent it back within days.

I reinstalled the module on my truck and fired it up.  It did NOT initially fix my problem and I was livid thinking I just wasted a hundred bucks and a lot of time.  I read somewhere that you may need to drive upwards of 20 MPH to make the module go through all of it's program routines or whatever.  Once I took it down the street, the light went off and hasn't been back on since.  BOOM!


Dr. BBQ’s Rub

1/4 cup salt
1/2 cup sugar
2 tablespoons brown sugar
1 1/2 teaspoons granulated garlic
1 1/2 teaspoons granulated onion
1 tablespoon paprika
1 tablespoon chili powder
1 tablespoon cayenne pepper
1 tablespoon freshly ground black pepper
1 1/2 teaspoons dried thyme
1 1/2 teaspoons ground cumin
1 1/2 teaspoons ground nutmeg

Saturday, July 26, 2014

Big Green Egg Baby Back Ribs

Want those fall off the bone ribs?  Just follow this simple 5 hour recipe.  Don't skimp on the time, if you don't have time, do something else.  Five or ten minutes per section won't hurt, but I've done abbreviated versions (like 3 hours total) and there is a clear difference in the tenderness of the meat.  Also, some people don't like the 'fall off the bone' kind of ribs.  They like it where the slab stays together and it's firm, making it easier to manage on the grill, etc.  So, to each their own, if you're shooting for a little less tenderness, customize this recipe to a 4 hour cook.  Find what works best for you, but here's mine:
  1. Remove membrane from back of ribs if your butcher has not already.
  2. Slather on regular ol' yellow mustard.  It acts as an adhesive for the rub you are about to apply.  Trust me, you will not be able to taste it.
  3. Add your favorite rub or you see my post on how to make your own.  Coat it liberally in every crevasse. 
  4. Setup your BGE for indirect with place setter legs up.  Use a drip pan to catch the juices.  I'll even add beer, water or apple cider vinegar to the drip tray to help keep a moist environment inside the grill.  I'm not sure how much this actually helps but it sure as hell doesn't hurt.
  5. Put the grate on top of the place setter and clean it thoroughly.
  6. Stabilize the fire at around 225-250.
  7. Add your favorite wood chunks.
  8. Put ribs on grill and set bottom vent to about a quarter of an inch and the top valve barely open.  Cook the rest of the way at a temperature between 200-225.
  9. Cook ribs for 2 hours.  This is where it's gonna get all the smoke flavor so keep the wood burning during this step.  After this, you can even get by with not adding any additional wood because during this phase the meat has absorbed all the smoke it's going to.
  10. Remove from grill, wrap in foil, return to grill for 2 hours (I sometimes spray with apple cider vinegar here, but again, not sure it really helps, the internal juices are enough I think).  This is the part where the ribs sit in their own evaporating juices and the collagen in the pork is breaking down to make them juicy and tender.  Pork is literally a different animal and is totally different than beef.  Low, slow and long for pork is where its at.  You have to cook through doneness, to tenderness.
  11. Remove from grill, remove foil wrapping and return to grill for one more hour unwrapped (just like the first two hours).
  12. Alternative to step 11.  I've experimented on this last hour with slowly getting the grill hotter to about 300-325, removing the place setter, slathering with BBQ sauce and cooking direct for a few minutes to get a good crust and let the sauce caramelize.  It's becoming my new favorite way but, either way works great.
 Tips:

  • Use something to keep the drip pan off the place setter, like a few bolts or even rolled up foil.  Creating some space will keep the liquid from boiling and evaporating quickly.
  • Rearrange ribs at a different places in the grill as you are foiling and unfoiling to ensure one rack isn't in a hot spot and cooks more than the others.


Tuesday, March 11, 2014

Homemade Calzones on the Big Green Egg

If you want to shake up your pizza night, make a calzone!  It's literally all the same ingredients you would use in a pizza.

400-450 degrees, 12-15 minutes, indirect heat, place setter legs down.  Two setups I've used:

  • PS, legs up, grate on, pizza stone on grate
  • PS legs down, cook directly on PS

  1. Roll out your dough to about the size of a pizza.  
  2. I used the Big Green Egg calzone mold thingamajig, but I'm learning now i could probably easily do without it.
  3. Spread dough over the calzone mold or just lay it flat on a cutting board.
  4. Pile all ingredients, starting with the sauce, on one side (see pic below)
  5. Fold one side of the dough over the other making a half circle.
  6. Dab some water on your fingers and rub onto the dough where you plan the two ends of the dough to meet.  This will help seal the dough together.
  7. Poke a few small holes or make a small slit in the top of the calzone to all eliminate air pockets.
  8. Cook for about 12-15 minutes.
  9. Tip #1:  Parchment paper is my new favorite tool.  Instead of dusting the stone with flour or anything, I start off cooking the calzones (or pizza) on a sheet of parchment paper.  About 3-4 minutes in, I pull the sheet out and discard.  The dough has cooked to a point where it's no longer sticky and will freely move around on the stone.
  10. Tip #2:  When  using the calzone maker, you'll have small pieces of excess dough come off.  Use with olive oil and Parmesan cheese and make little bread stick bites for an appetizer.


Friday, January 17, 2014

Bourbon vs Whiskey

Because we're avid whiskey drinkers, it seems a conversation is frequently being had about the differences in bourbon vs whiskey vs scotch, etc.  Not that it really matters at all, but just to set the record straight, (and so I can remember), I'm going to do a post about this topic.  Let's not beat around the bush, the blog is mainly a repository for useless information anyway so this topic fits perfectly.

All bourbons are whiskies, but not all whiskies are bourbons.
All scotches are whiskies, but not all whiskies are scotches.

Got it?

We owe the Irish for their Gaelic term “uisce beatha” which translates to “water of life”. The word uisce became whiskey.

At a high level, the word whiskey indicates the broad genre of this type of liquor, the entire spectrum so to speak.  It's kind of like saying "red wine", but there are various types of red wines like cabs, malbec, merlots, etc.  Bourbon, scotch and rye are the various types of whiskey.  At it's core, whiskey is simply a distilled beverage made from fermented grain mash.  The contents of the mash and/or the location in which the liquor is made, can dictate which "sub-category" it can fall into.

*Just so you know, "Mash" is the grain mixture that is mixed with water and yeast.  Basically, the starting ingredients of what will ultimately become the booze.  The ratio used in that mixture will determine much of how that spirit will be classified when produced.


BOURBON

Bourbon whiskey is a type of barrel aged spirit made primarily from corn.  Corn being the key factor as you will soon find out.  The name comes from a French royal family that once ruled France and was pronounced BOOR-BAWN before we rednecked it all up.  In the 1800's, West Kentucky and parts of Virginia were settled by a large French influence.  Part of this area is now current day "Bourbon County", hence the name of the spirit from this area.

Firstly, let me dispel a common misnomer:  "To be called Bourbon, a spirit must be made in Kentucky".  This is FALSE.  The location is irrelevant, except it must be made in the good ol' US of A to be considered a bourbon, with the below qualifications.  Generally, I think that the old Kentucky distilleries want you to think that only the real "bourbon" comes from Kentucky, but about 20 other states sell the stuff.  Not to mention, only about 4 huge conglomerate companies own most of the bourbon coming out of the state of Kentucky....That's 'Merica.

The Federal Standards of Identity for Distilled Spirits state that bourbon made for U.S. consumption must be:

  1. Produced in the United States
  2. Made from a grain mixture that is at least 51% corn (the remaining can be any other grain)
  3. Aged in new, charred-oak barrels
  4. Distilled to no more than 160 proof, entered into the barrel for aging at no more than 125 proof and bottled at 80 proof or more
"New" is highlighted because a barrel cannot be reused, at least not to make bourbon.  Scotch does not have this requirement, therefore used bourbon barrels are sometimes sold to scotch makers.  A fun fact is that approx 20 lbs of bourbon gets absorbed by the barrel so it's that much heavier after the fact.

Contrary to popular belief, bourbon has no minimum specified duration for its aging period.  Products aged for as little as three months are sold as bourbon.  The exception is "straight" bourbon, which has a minimum aging requirement of two years. In addition, any bourbon aged less than 4 years must state the age of the spirit on the bottle.

Tennessee Whiskey

Jack Daniels sells the most liquor in the world, but Jim Beam claims to have the best selling bourbon in the world.  Why?  Because Jack Daniels doesn't consider itself bourbon.  Say what?

Obviously, Tennessee whiskey must be made in Tennessee.  The interesting part is that this name is more about branding and marketing than the technicalities of the liquor being produced.  Many of the whiskies made in Tennessee meet the requirements to be considered bourbon, but they are labeled as "Tennessee Whiskey" as a way to differentiate themselves from bourbon.  Tennessee whiskeys undergo a filtering stage called the "Lincoln County Process", in which the whiskey is filtered through a thick layer of maple charcoal before it is put into new charred oak barrels for aging.  The law states that it must be aged, but does not specify how long.

The long and short of it is, Tennessee whiskey is bourbon made in Tennessee that is filtered through maple charcoal and aged an unspecified amount of time.

Scotch

To be called Scotch, this spirit must be:
  1. Made entirely in Scotland
  2. Mash must be made from some percentage of malted barley (hence the single malt, etc)
  3. Aged 3 years
I love bourbon but I hate scotch, so go figure...I must not like malted barley.

So a fun fact about the word malted, it can be any grain, not just barley.  It basically means the grain is made to germinate by soaking in water and then halted from the germination process by drying with hot air.  So the grain is given water and instinctively, it attempts to sprout roots and grow.  As soon as that happens, the growing process is stopped by removing the water and letting it dry out.  The roots and sprouts are removed and the sprouted kernel is all that is left.  It is a common belief that liquor made with malted grain is easier on the next day hangover.

American Rye Whiskey

Similarly to how Bourbon's requirement is 51% corn, Rye whiskey must be 51% rye.  The remaining can be corn or barley or whatever, just like in a bourbon.  So technically a few percentage points differences in the mash between corn and rye could dictate whether a spirit is a bourbon or rye.  Rye tends to add a bit of spice to the flavor...the more rye, the more spice.

Canadian Rye Whiskey

The odd thing about Canadian rye, there is no actual requirement that the mash require any rye at all.  Since historically, much of the content was rye, it sounds like it's just sort of assumed in Canada, but there is no legal requirement.  Most of them do contain rye and are blended to achieve a unique taste and aroma, but let's be honest Canadian whiskey blows.  Minimum 3 years aging is required.

Corn Whiskey

Made with a mash of 80% corn and no aging is required.  This is your run of the mill, on a tight budget, legal moonshine.  Right on man.


Thursday, December 19, 2013

Spatchcock Brick Chicken

When I learned about spatchcocking, I was fascinated.  It's a very odd word for basically cutting out the backbone of a bird and butterflying it (there are many YouTube videos describing this process).  It's surprisingly easy and it allows the chicken to be laid flat during cooking.  If you've ever cooked a whole bird, you know the challenge is constantly making sure the drum/thigh is fully cooked without over cooking the breasts (everyone always over cooks the breasts).  This method helps tremendously with this problem.

This cook is inspired by a special from Jim's Place Grill in Collierville, TN.  Much of my method is derived from asking their waiter how their brick chicken is prepared.  The purpose of the brick is two fold, it makes the skin crisper and it allows for a faster cooking time.  Jim's Place does a boneless presentation.  I'm not sure how in the hell they do that, but I can see how it would be possible because the meat is falling off the bone when using this method.

I've done this two ways, both at about 400 degrees

1)  In oven in cast iron skillet
2)  In Big Green Egg over direct heat

I will describe my BGE method.

  • Clean and remove the insides.
  • Spatchcock and brine the bird.  Brining consists of letting the meat "marinate" in a salt/sugar/water mix for a period of time.  This period of time can be from a couple of hours to overnight. (3/4 cup salt per gallon of water, same for sugar...even brown sugar can be used)
  • After brinning, add olive oil/rub and let the bird set out at room temperature for an hour, go easy on the salt if you brined it, otherwise it may be too salty.
  • Get your BGE going and stabilize at 400, clean off cooking grid and spray with oil/pam so the skin doesn't stick
  • Wrap a regular ol brick in tin foil (I let the brick heat up with the grill so it cooks from both sides)
  • Put bird on the grill, skin side down and place brick on top in the meatiest part and make sure it will stay put (approx 15 min)
  • Let it cook this way for 15 minutes to brown up the skin and remove brick (with heat glove) and place it on a heat resistant surface momentarily
  • Flip the chicken over (skin side up), replace the brick using the other side of the brick to avoid potential contamination (not sure this is required, just something I do)
  • Insert a meat thermometer and cook the rest of the way like this reaching internal temp of 160, which usually takes about another 30-40 minutes (I try to time it just right where I can shut down the BGE and cook it the rest of the way, like shutting it down at about 150.  It will keep that temp another 10 minutes easy to finish out the cook and save fuel)

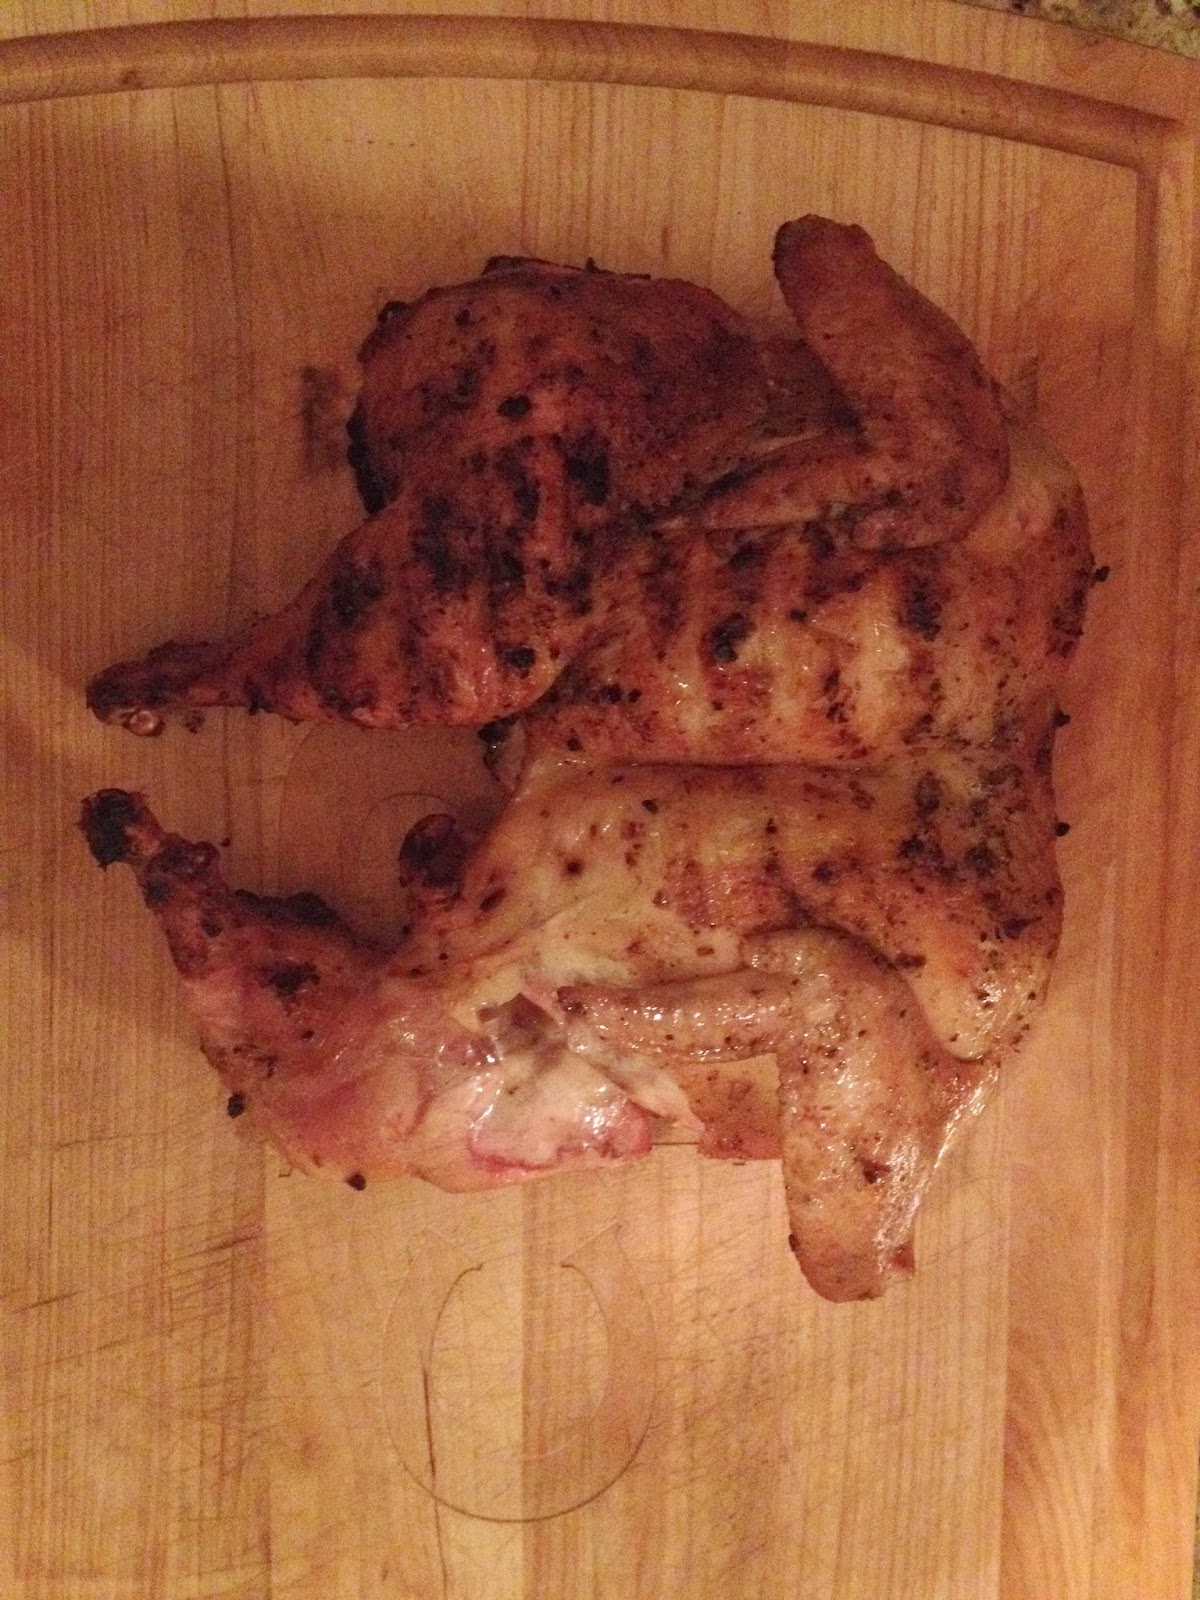
NOTE:  The pic below shows one that was left on for 20 minutes on first side.  It was slightly charred so that's why I backed it down to 15 minutes on first side.  You can see on the second pic as I try to pull the leg off, the drumstick just comes right out because it's so tender.


Here is one that is flipped after 15 minutes on the first side.  The skin is perfect.


Search This Blog